
Video guide
Prefer to watch? This video walks through setting up custom orders — enabling the service, your description, packages, add-ons and the exclusive option.
Custom orders let your fans pay you to film a one-off clip exactly the way they describe it. You set the rules — what packages you offer, what extras cost, how fast you deliver — and customers fill out a form on your storefront. You decide whether to accept each request, the customer pays, you film, you upload, and the clip is delivered automatically.
This article walks you through the whole flow from setup to delivery.
1. Where the settings live
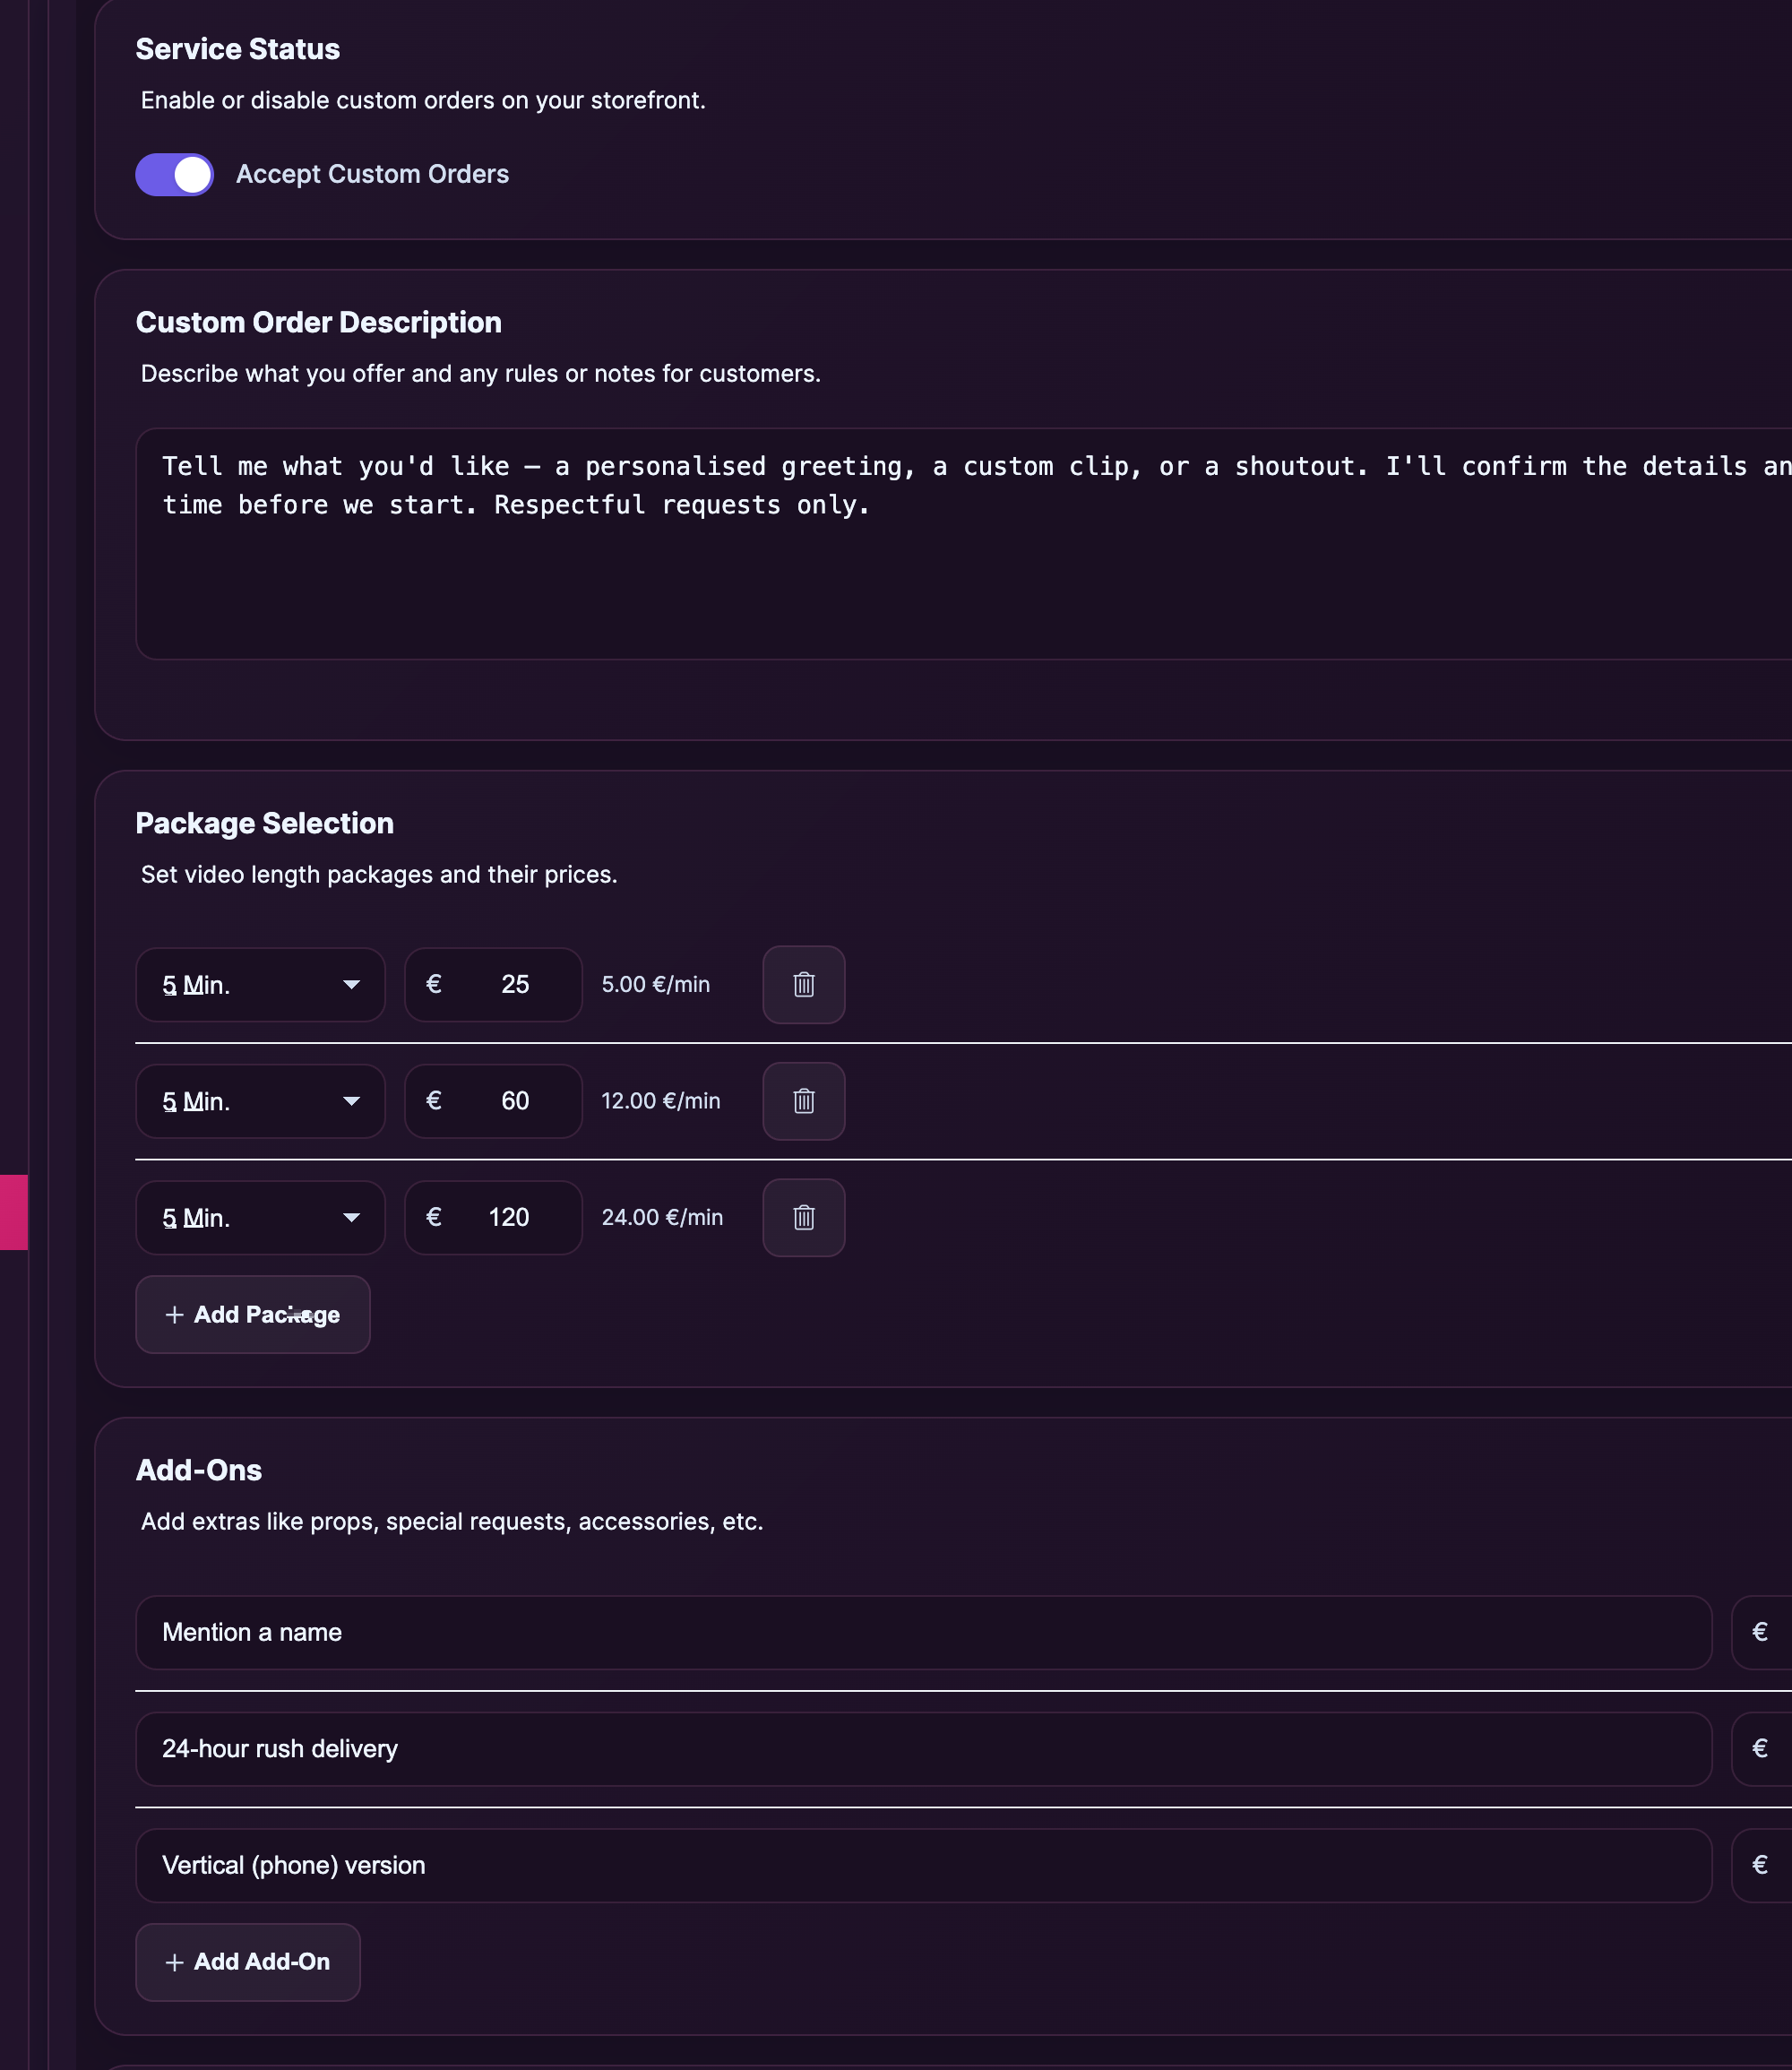
Open Store Manager → Custom Settings. That’s the page where you turn the service on and configure your packages, add-ons, resolutions, delivery times, and your exclusive option.
You’ll find a second page right under it called Custom Orders — that’s your inbox. Every request a fan sends shows up there, with a status, the customer’s story, and the buttons you need to accept, decline, message, or deliver.
2. Turning the service on
At the top of the Custom Settings page is a Service Status card. Flip the toggle labelled Accept Custom Orders and click Save Settings.
While that toggle is off, the Order Custom tab on your storefront shows fans a short message: “This creator is not currently accepting custom orders.” No request form, no order button. As soon as you flip it on and save, the form goes live.
You can flip it off any time — for example if you’re going on holiday, your turnaround is full, or you simply don’t want new requests this week. Existing orders aren’t affected.
3. Writing your description
Below Service Status is a Custom Order Description box. Up to 3,000 characters. This is the first thing a fan reads on the order form, so use it well.
Tell people:
- What kinds of customs you do — and what you don’t do.
- Anything they need to send (photos for reference, names you’ll mention on camera, etc.).
- Your usual turnaround.
- Anything that bumps up the price (rush delivery, extra props, more than one outfit).
- What’s strictly off-limits.
If your description is longer than ~200 characters the form shows a Show More button so fans can expand it.
4. Setting your packages
The Package Selection card is where you set how long the customer’s clip will be and how much that costs. Each row has two fields: a length picker (5, 10, 15, 20, 30, 45, or 60 minutes) and a price in euros.
Use Add Package to add another row, the trash icon to remove one. The form auto-shows a “€/min” rate next to each row so you can sanity-check your pricing.
You need at least one package — that’s what fans pick from on the order form.
5. Add-ons, resolution, and delivery time
Three more cards let you add extras a customer can stack on top of a package:
- Add-Ons — anything you want: props, costume changes, dirty talk, name shout-outs, role-play prompts. Each row is a name and a price. Set the price to €0 for a free extra.
- Resolution — usually 720p, 1080p, 4K. Each row is a name, a price, and a toggle to enable it. Set the price to 0 on the row you want as your free default tier and toggle the others on at a price.
- Delivery — your turnaround tiers. Common pattern: “1 Week” at €0 (your standard speed), “3 Days” at +€10, “24 Hours” at +€25 (rush). Same toggle/price logic as Resolution.
Fans pick one resolution and one delivery tier when they order. Add-ons are checkboxes — they can pick none, one, or many.
6. The Exclusive option
The Exclusive Option card is for customers who want the clip to belong only to them — nobody else on the platform will ever see it.
Flip the Offer Exclusive Upgrade toggle and set a price. On the order form fans see a separate Exclusive section labelled “Upgrade to a private, exclusive custom – for your eyes only” with a checkbox Make it Exclusive.
If they tick it, the price gets added to the order total. When you deliver the clip and it goes through review, only that one customer ever gets access — the clip never appears in your public catalogue, search, or anyone else’s library.
You don’t have to offer this. Lots of creators don’t. But if you do, price it for what it really costs you to give up the clip forever — usually a serious multiple of your normal package price.
7. The request comes in — your inbox
When a fan submits the order form, three things happen:
- A new row appears at the top of Store Manager → Custom Orders, with status Pending Review.
- An order is created in the customer’s account, but it’s parked — the customer can’t pay yet. The system note on it reads: “Custom order request placed. Payment will open after the creator accepts it.”
- The customer gets a confirmation: “Your custom order has been placed as order #X. The creator will review it before payment opens.”
Open Custom Orders. Click the row to expand it. You’ll see two panels: the Customer Story (whatever they typed in the form, up to 10,000 characters) and the Order Details (package, add-ons, resolution, delivery, exclusive flag, total).
The actions you have on a pending order:
- Accept Order — the request becomes payable. Status flips to Pending Payment and the customer gets a note that says: “Your custom order was accepted. Please complete payment so the creator can start working on it.”
- Decline — the request is closed. Status flips to Cancelled, the order moves to “cancelled” with the note “Creator declined this custom order request.”, and the customer gets “The creator declined this custom order request.”
- Message Customer — opens a DM thread with the fan in your normal messages page. Use this if you need to clarify something before deciding.
- Add Custom Fee — see the next section.
8. Adding a fee for special requests
Sometimes the story includes things you weren’t planning to charge for in your standard packages — extra props, an unusual location, a rush you can’t quite hit on your normal “3 Days” tier. While the order is still Pending Review, you can add a one-off fee instead of declining.
Inside the expanded order panel, click Add Custom Fee. You get two fields:
- Fee Amount — euros, decimal allowed.
- Reason (optional) — e.g. “Special props, extra scene, rush delivery…” The customer sees this on the order, so use it to explain.
Click Add Fee (or Update Fee if you’ve already added one and are tweaking it). The fee is added to the order total before the customer is asked to pay. Use Remove to drop it again. Once the customer pays, the fee is locked in — you can’t change it after that.
Tip: always send a short DM before adding a fee so the customer isn’t surprised when they open the order to pay.
9. After payment — actually filming and delivering
Once the customer pays, the order status flips to Paid. The system automatically moves it on to In Progress when you mark it as such, or when you upload the clip.
Two ways to start working: from the inbox, click Start Working on the order. That just flips the status so the customer sees you’ve begun. They get a note: “The creator started working on your custom order.”
When the clip is filmed and ready, click Upload & Deliver (Add Clip). That takes you straight to Store Manager → Add Clip — the same form you use for any other clip.
The Add Clip form has an extra section called Custom Order Delivery. Tick the box Is this a custom order?. A second field appears: Select Custom Order. Pick the right one from the dropdown — it lists all your open requests with the customer’s name, the package, and the total.
If the customer ordered the Exclusive option, the Exclusive custom (only the customer gets this clip) checkbox is auto-ticked for you, and the small note underneath reads: “If checked, once reviewed and approved, only the customer who ordered it will have access.” You generally shouldn’t untick it.
Fill in the rest of the clip form the way you always do — title, description, price (mostly cosmetic for customs since the customer already paid), thumbnail, performers, and the main video file. Submit for review. The full upload flow is covered in How to add a clip — from upload to publishing, and the rules around editing or replacing the file later are in Editing or deleting a clip after publish.
10. Review, delivery, and what the customer sees
The clip goes through normal moderation, exactly like any other clip you upload. Once a moderator approves it, two things happen automatically:
- The custom order flips to Delivered. The customer gets a note on their order: “Your custom order is ready. You can now open the order and download the delivered video.”
- The clip is added as a download to their existing paid order. They can play it from My Library and download it as many times as they like.
If the order was Exclusive, the clip is hidden from the rest of the platform — it doesn’t appear in your public catalogue, in search, or in anyone else’s library. Only that one customer can see and download it.
Once delivery is confirmed and payment is settled, the order moves to Completed and your earnings appear on your sales report under that order’s commission line. You don’t need to do anything else.
If the moderator asks for changes or rejects the clip, the same fix-and-resubmit flow applies as for any other clip — see Why was my clip rejected. The custom order stays in In Progress until the resubmitted clip is approved.
Frequently asked questions
Q: A fan asked for something I won’t do. What do I do?
Click Decline. The customer sees a clear “The creator declined this custom order request.” message and the order is cancelled — they’re never charged. If it’s borderline, send a DM first via Message Customer to talk it through; you can still decline (or accept) afterwards.
Q: Can I accept now and let the customer pay later?
Yes — that’s exactly how the flow works. Acceptance just opens up payment. The customer can take their time. The status sits at Pending Payment until they actually pay. If they never pay, you simply never start work.
Q: I started filming, but the customer changed their mind. Can I refund?
That’s a support-team conversation. Open a support ticket so we can review the order, your work, and the customer’s reason. We don’t refund through the Custom Orders inbox by design — it’s a manual process so neither side feels rushed.
Q: Why does the new clip ask for a price if the customer already paid?
Because the Add Clip form is the same form you use for everything else, and it expects a price. For customs the price field is mostly cosmetic — payment is already settled through the custom order. Pick something sensible (your normal price for a clip of that length) and move on.
Q: My customer paid, but I still see “Awaiting payment”.
Refresh the page. The status updates as soon as the payment settles. If it stays stuck for more than a few minutes, open a support ticket — there may be a payment delay we can chase down.
Q: Can I run promotions on customs?
Not through this page directly. The packages are flat prices. If you want to offer a discount on a specific request, the cleanest workaround is to message the customer with a discount on the side or temporarily lower one of your packages. The custom-fee field is for adding to the total, not subtracting from it.
Q: How do I see how much I’ve earned from customs?
Customs are recorded on your normal sales dashboard like any other order — each one shows up as a commission line tied to that custom order’s number.
Q: A customer keeps sending requests I don’t want to do. Can I block them?
Not from the Custom Orders page directly. Decline what they send. If it crosses into harassment, take a screenshot of the most recent request and open a support ticket — we can handle blocks on our side.
Need more help?
If you’re stuck on something not covered here — payment didn’t settle, a delivered clip isn’t showing up in the customer’s library, or anything around refunds — open a support ticket from your store manager and pick the Custom orders category. Include the order number and we’ll take a look.